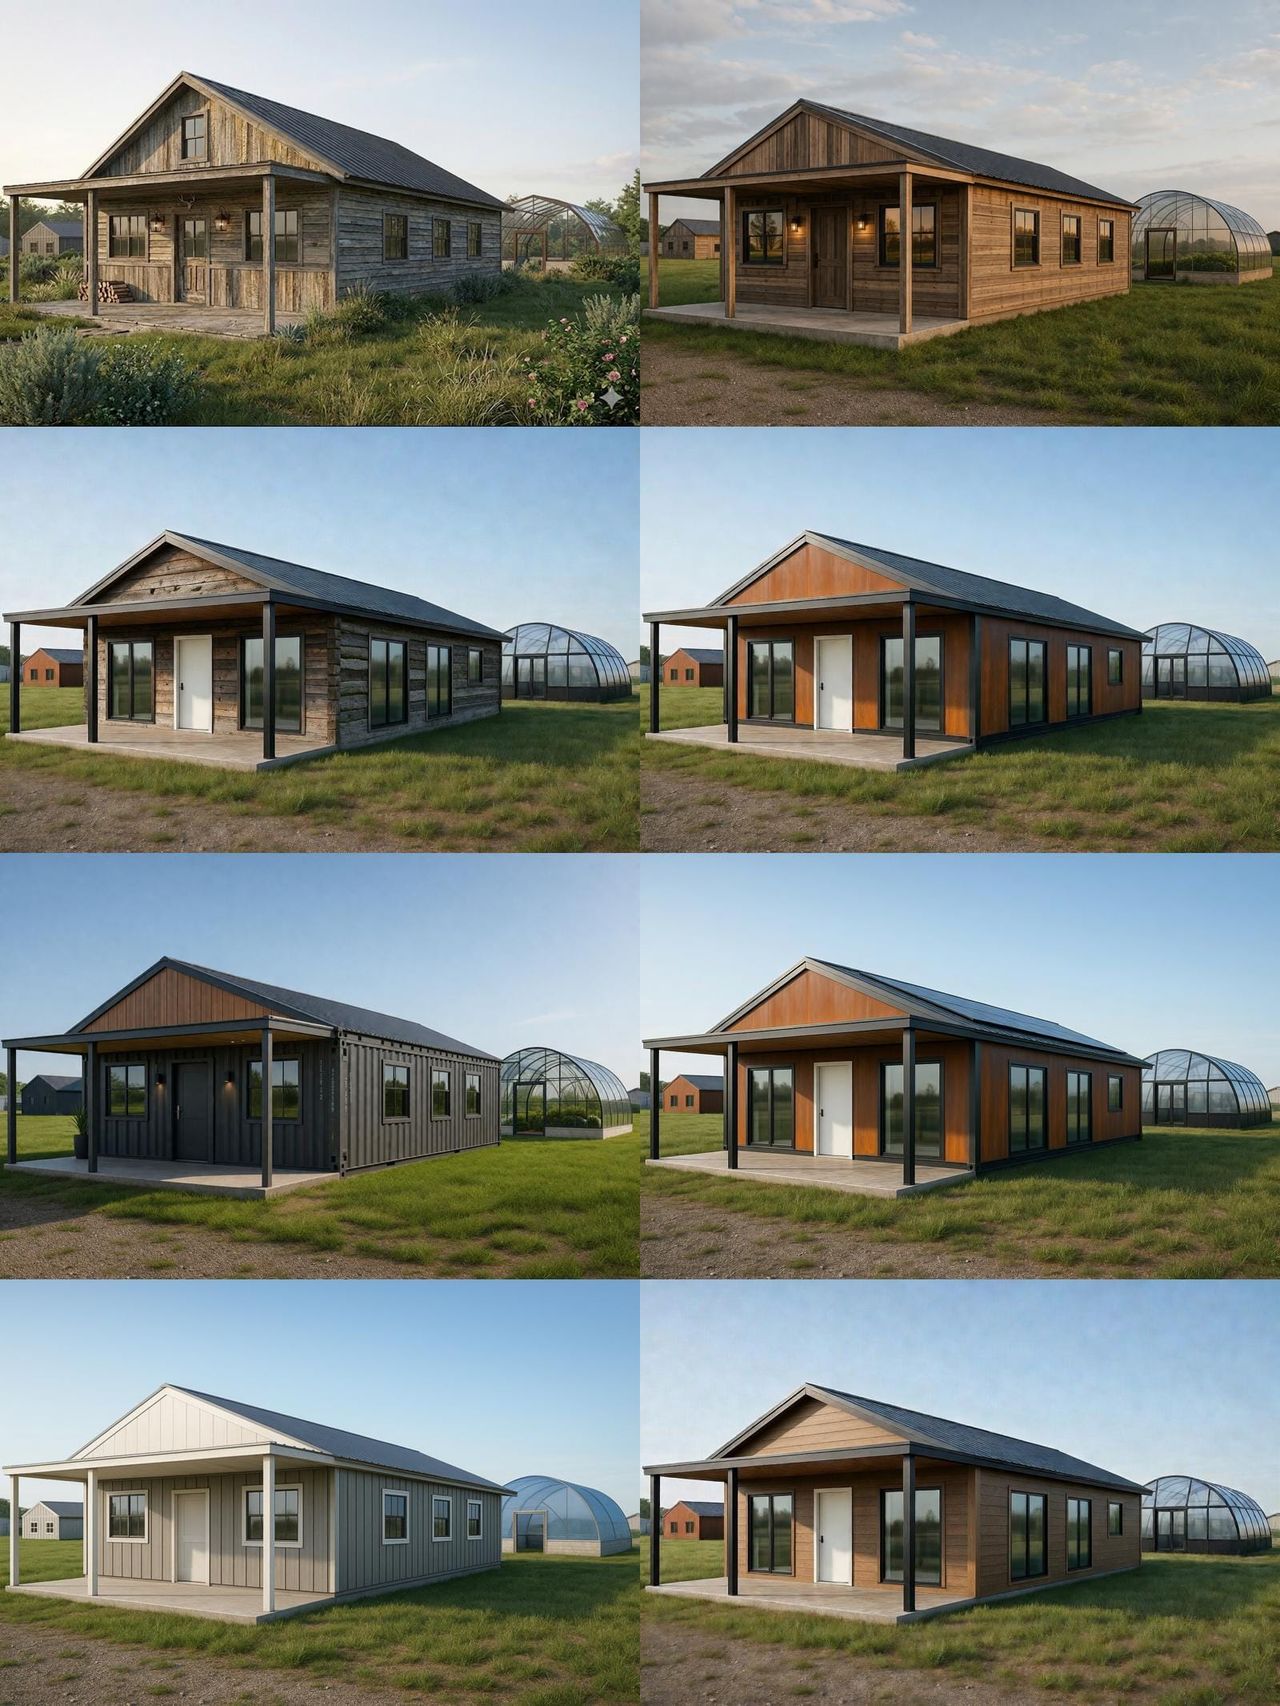
1280sqft 3BR 1BA Shipping Container Home for $25k

This is a very cool 1280sqft 3BR 1BA Shipping Container Home for $25k design I originally designed back in 2012 over 10 years ago. A lot has changed since then, but this shipping container home design is by far one of the most popular designs I ever created. It's a very simple and inexpensive way to create a large footprint home with a limited budget. $25k is for the bare-bones shell and doesn't include all your amenities appliances or equipment.
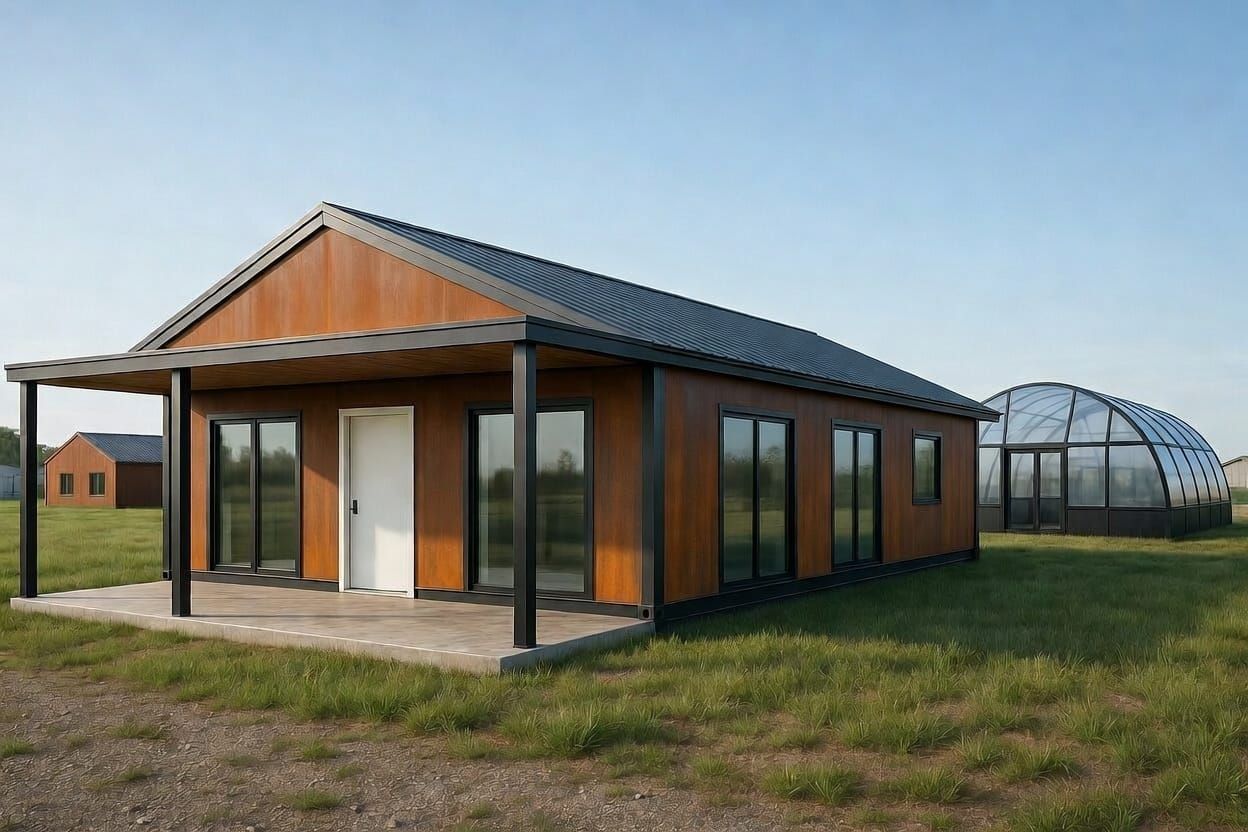
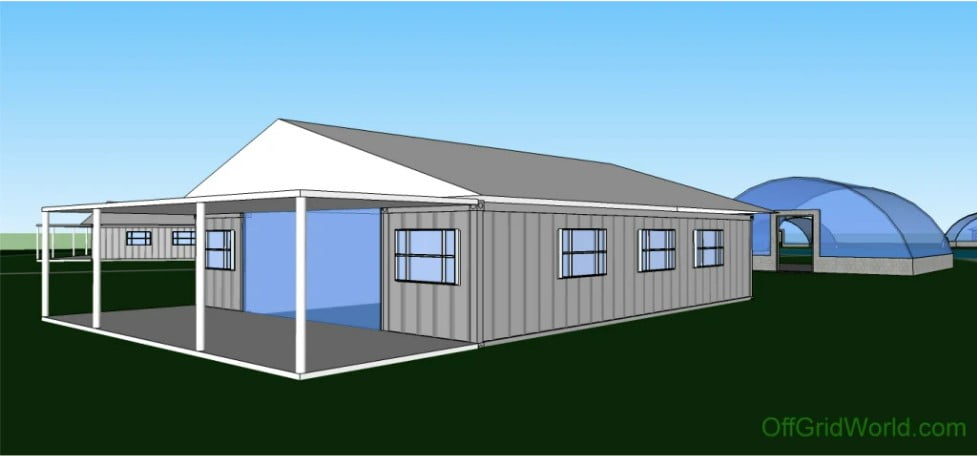
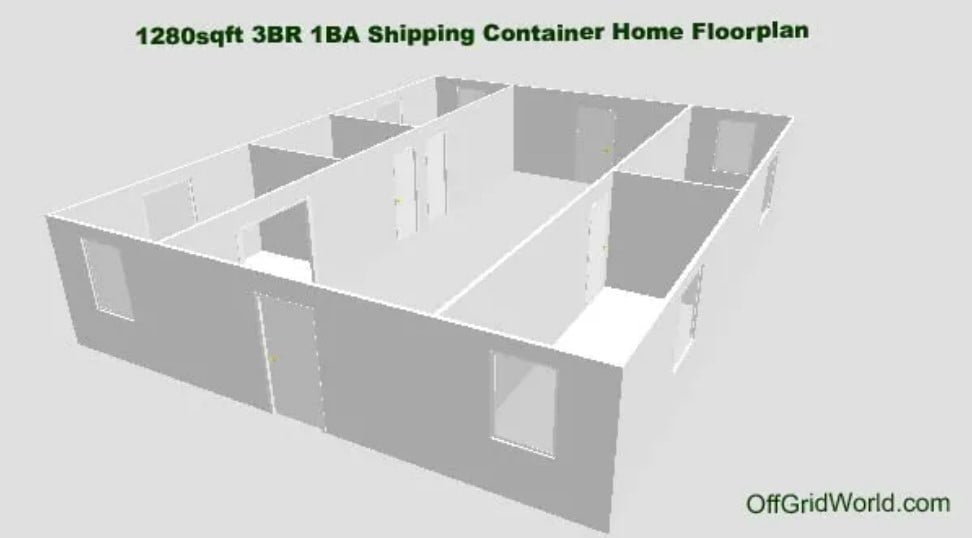
This is another design concept that uses 2 shipping containers for a 1280 square foot ranch style shipping container home. The key here is to maximize floor space with a minimal amount of materials.
UPDATED FOR 2025:
DIY-Heavy Budget (2025)
1280 sq ft Shipping-Container Ranch — Bare-Bones Shell (2025)
Materials (target ≈ $10,000)
- (2) 40’ High-Cube containers (WWT / cargo-worthy, used) – $6,000
$3k each picked up; cosmetic wear acceptable. - Footings/piers (12–16 piers), concrete, rebar, forms, sonotubes – $900
DIY auger; includes PT sill plates & anchors. - Tie hardware + steel plates/angle, anchors, welding consumables – $350
- Main roof over 16' span (trusses or LVL ridge + 2× rafters) – $1,100
4:12 pitch; includes hurricane ties/hangers. - Metal roofing package (≈ 1,000–1,200 sq ft @ 29 ga) – $1,150
Panels, ridge/valley/trim, butyl tape, underlayment, screws. - Gable/end sheathing + porch ceiling (OSB 7/16") – $300
- Housewrap/flashing tape for gables & cutouts – $200
- Porch structure (PT 6×6 posts/beam, 2× framing) – $400
- Framing lumber for openings/headers (doors, windows, interior cutouts) – $300
- Exterior man door (basic steel) + reuse container doors for rear/service – $250
- Windows (6 basic 36×36 vinyl sliders) – $900
- Sealants/primer/elastomeric for roof penetrations & container seams – $450
Materials subtotal: $10,300
Non-labor costs (you still pay these)
- Container delivery & set (tilt-bed; light crane only if needed) — $1,500
Distance-dependent; rollers/jacks can avoid crane in many sites. - Cutting/welding consumables — $600
Abrasive wheels, flap discs, rods/wire, gas, primer, anti-corrosion. - Roof install helper-days (2 people × 1–2 days) — $600
Cash/food/beer—just enough hands to fly panels safely. - Equipment rentals (bundle) — $2,200
Welder or spool-gun if you don’t own, mag-drill, small lift/boom for roof day, auger/mixer, safety gear, bits/blades. - Waste/haul-off & dump fees — $450
Non-labor subtotal: $5,350
Contingency
- 10% of materials + non-labor — $1,535
Build Cost (to reach $25k total)
- Container delivery & set (roll-off + light crane if needed) – $2,000
- Cutting/welding/lintel work (doors, windows, big interior openings) – $2,500
- Roof framing & sheet-metal install (crew help) – $3,000
- Concrete crew for piers/footings – $2,000
- Door/window install – $1,200
- Equipment rentals (welder, mag-drill, lift/boom day, auger), blades/discs – $1,500
- Waste/haul-off, incidentals, PPE, chalk/lines, layout – $800
- Contingency (≈10%) – $2,000
Labor/equip subtotal: $15,000
Grand total (shell, dried-in): ≈ $25,000

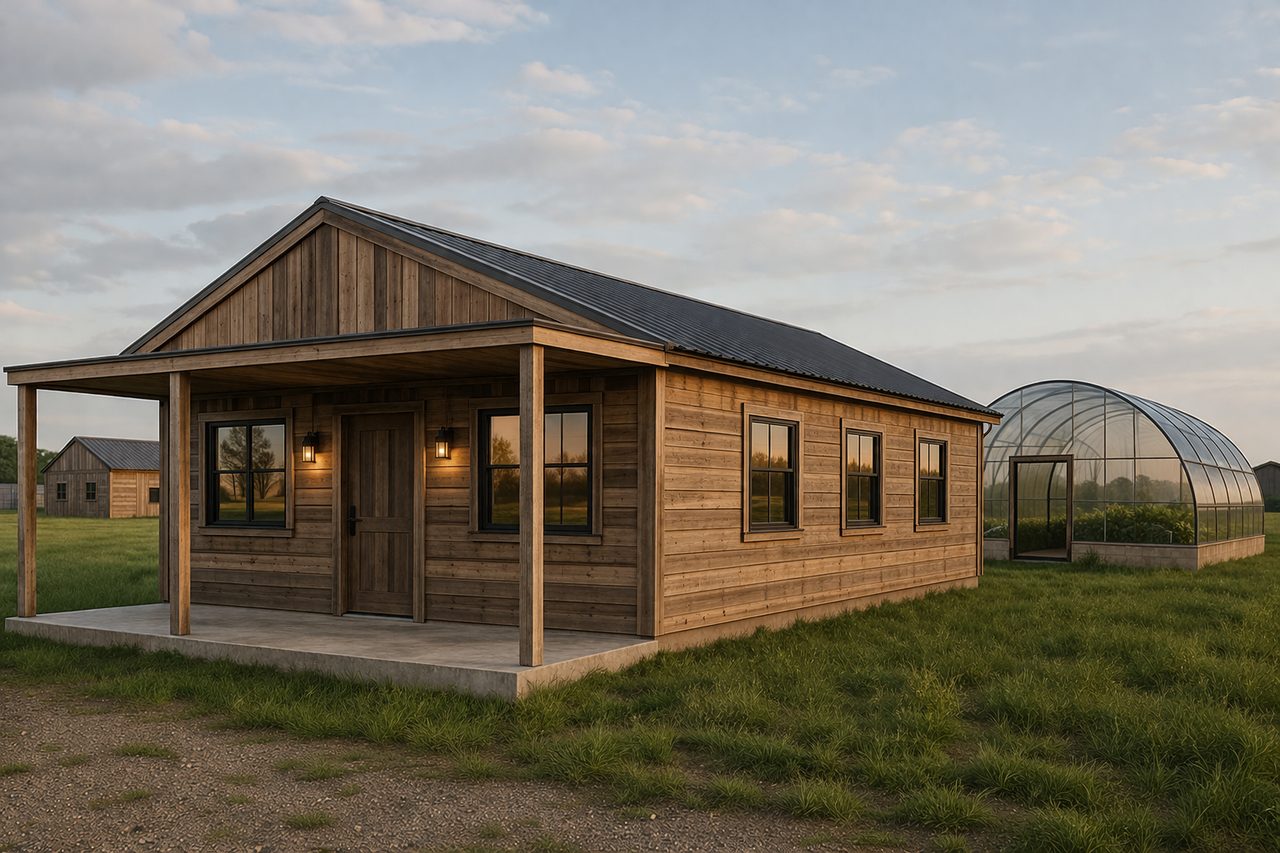
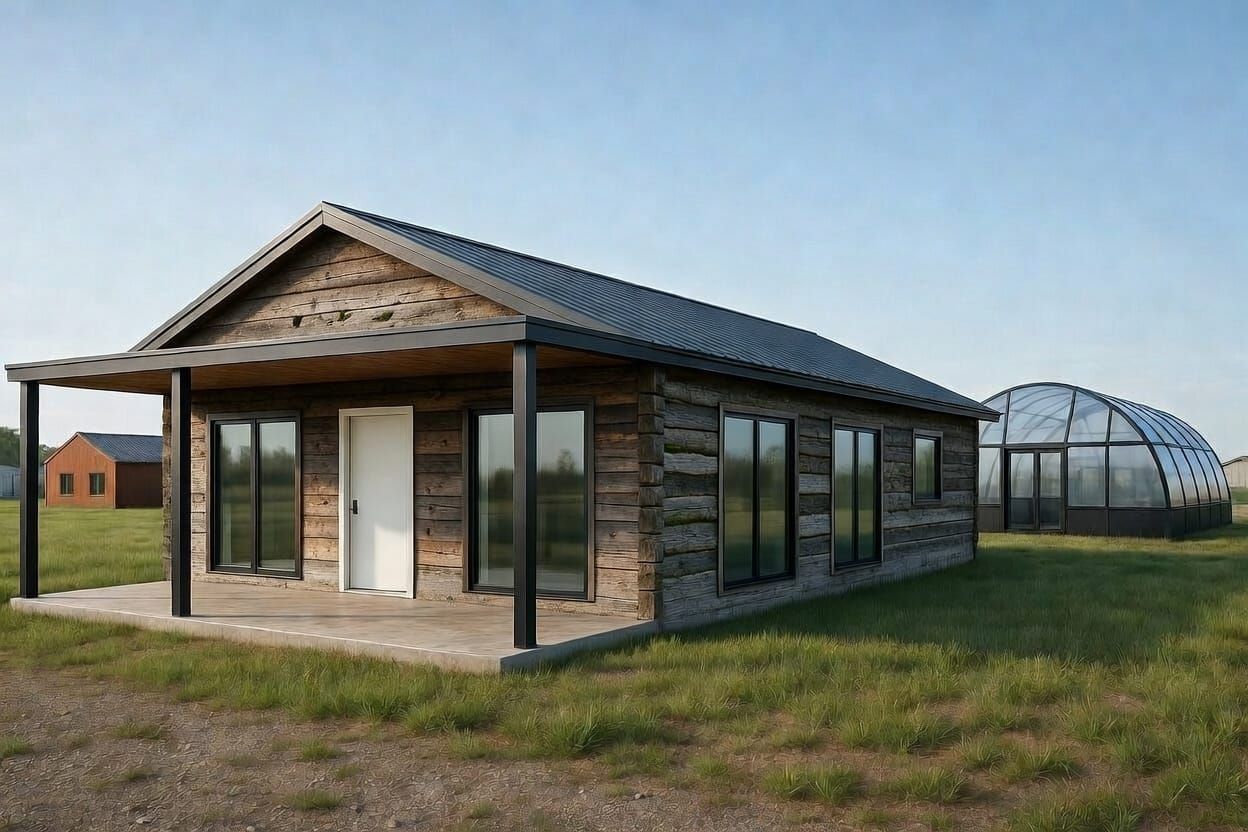
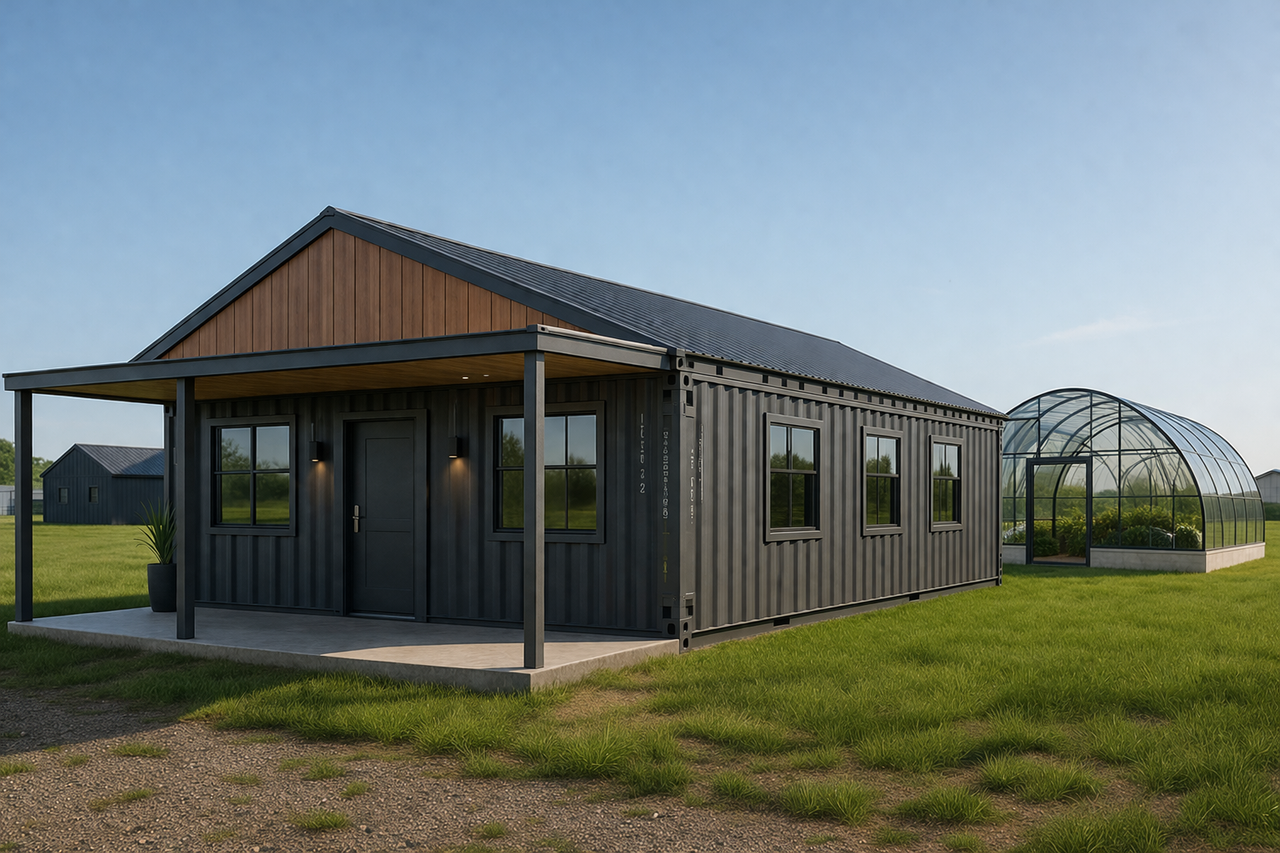

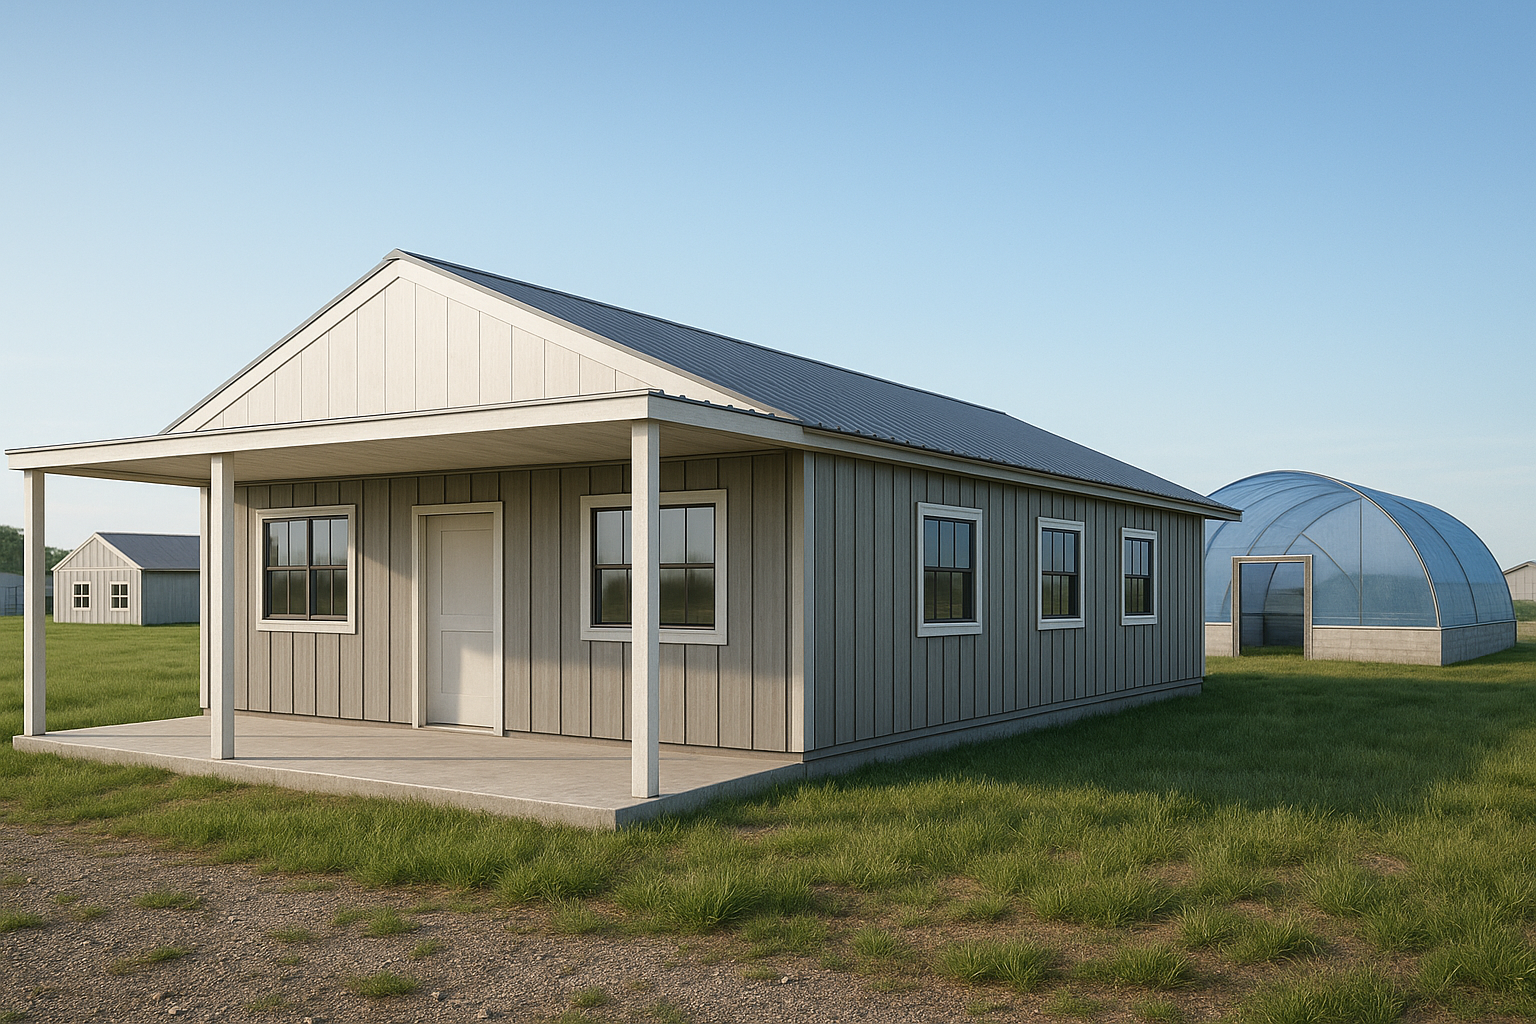
DIFFERENT SIDING CHOICES


DIY Rough-In (2025 prices)
Electrical (DIY materials)
- 125–200A main panel + breakers: $350–$600
- Grounding: 2× ground rods, #6 CU, clamps: $80–$150
- Branch wiring (mix of NM-B in framed cavities and EMT/MC on steel): $700–$1,200
(~1,200–1,600 ft assorted 14/2, 12/2; or MC; plus EMT, couplings, straps, bushings) - Boxes, devices, plates (≈ 35–45 outlets/switches, GFCI/AFCI where required): $220–$380
- Lighting rough-in (15–20 canless LED pucks + boxes): $220–$380
- Exterior/porch circuits, weatherproof boxes/covers: $90–$160
- Misc (staples, straps, wire nuts, anti-oxidant, labels): $60–$110
Electrical DIY materials subtotal: $1,700–$2,980
Plumbing (DIY materials)
- PEX (A or B) supply (manifold or trunk/branch), ¾″ + ½″, 500–800 ft + fittings, valves: $500–$900
- Manifold or distribution blocks + shutoffs: $120–$250
- Water heater placeholder (budget): tank 40-50 gal electric or small propane tankless: $400–$1,000
- DWV: PVC Sch40 1½″/2″/3″ pipe + fittings, traps, cleanouts, roof vent flashing: $450–$900
- Hose bibs (2), laundry box, toilet flange, wax rings, supply stops: $120–$260
- Hangers/insulation sleeves, firestop, primer/cement, test plugs: $80–$160
Plumbing DIY materials subtotal: $1,670–$3,470
Rentals/incidentals you may still need
- Conduit bender, hole saws/step bits for steel, GFCI temp power, test gauges: $150–$350
What that does to the budget
- Shell (DIY from earlier): ≈ $16.9k
- Electrical DIY materials: $1.7k–$3.0k
- Plumbing DIY materials: $1.7k–$3.5k
- Small rentals/incidentals: $0.15k–$0.35k
New total (dried-in shell + MEP rough-in, DIY):
≈ $20.5k–$23.8k (still under your $25k target).
Add 10% cushion if your site forces MC/EMT everywhere or DWV runs get long.
MATERIALS COST: $10k
TOTAL EST. BUILD COST: $25k
(bare bones shell)
1280sqft ranch style shipping container home – for less than the price of a new car!
This assumes it's set on piers or rock or block. No concrete foundation. Price does not include septic or well. A lot has changed since I originally designed this home, but this shipping container home design is by far one of the most popular designs I've ever created. It's a very simple and inexpensive way to create a large footprint home with a limited budget. $25k is for the bare-bones shell and doesn't include all your amenities appliances or equipment. This is another design concept that uses 2 shipping containers for a 1280 square foot ranch style shipping container home. The key here is to maximize floor space with a minimal amount of materials.
40' shipping containers can be purchased for about $2500 to $3500 used. About $5k to $7k new. The 40' containers give you about 320sqft of space, minus the walls/insulation. I would suggestion spray foam insulation...or if you can get it permitted, insulate the EXTERIOR of the home adobe style with mud/clay straw mixture. This saves you room inside the container and insulates very efficiently from the elements. The only issue might be getting it permitted and maintenance. Adobe tends to need significant maintenance. But if it were me, this is the kind of home I will be building. I'm not going to build a log cabin. I like shipping container homes better. They're practically indestructible. Though they are prone to rust, so you may have to treat them. Also make sure they're not painted with lead based paint. Not sure how to do that. And make sure the floor isn't stained or contaminated with chemicals from transport. This is why buying new containers might be a better way to go.
Minimalist home design
This design uses a minimalist approach to maximize livable floor space and the square footage of the entire footprint of the home, all while using the least amount of materials. This will reduce the total cost to build. Like many of our other shipping container home designs, we’re trying to keep things simple and affordable.
Simplicity
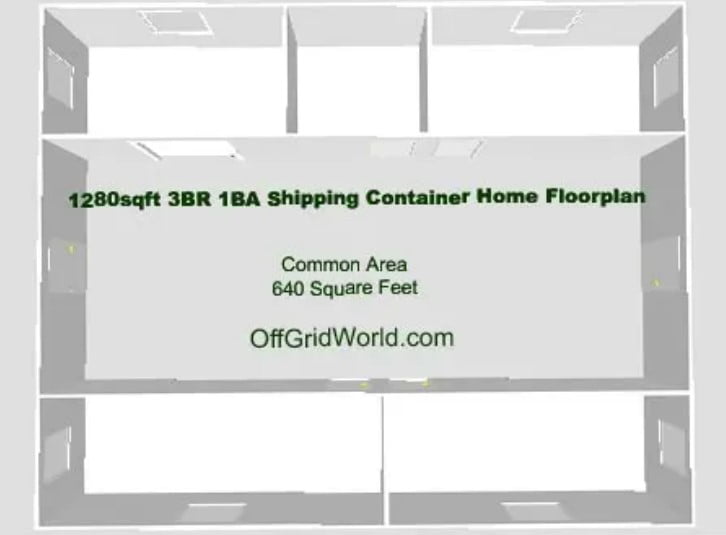
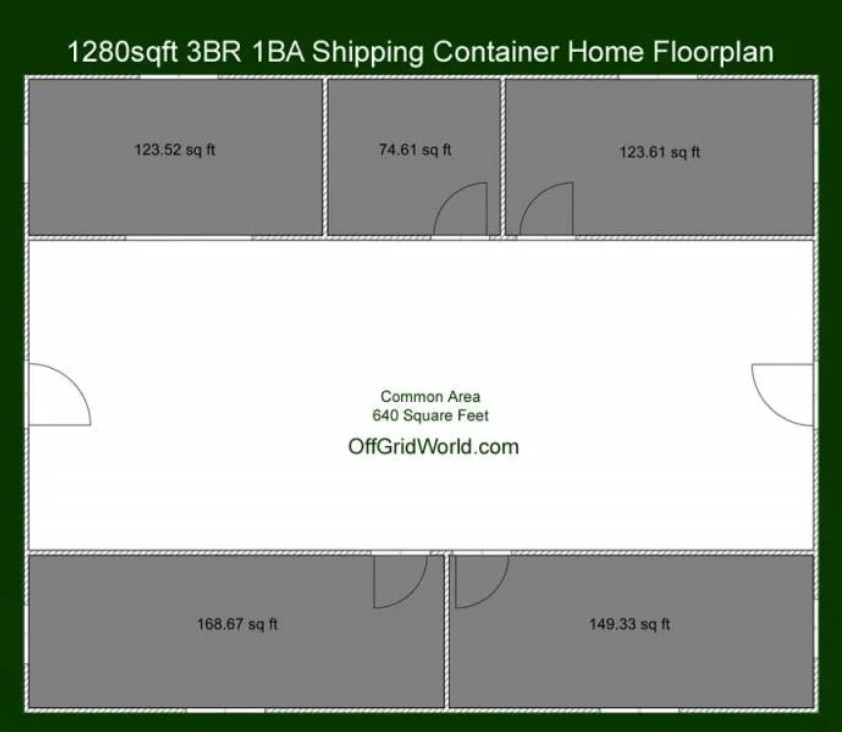
The design is so simple. It uses just two standard 40’ ISO shipping containers spaced 16 feet apart to form a grand entrance and living room/dining room space. This space is 640 square feet, with 12-foot vaulted ceilings. The two containers off to each side form the outer walls and contain the bedrooms and bathroom.
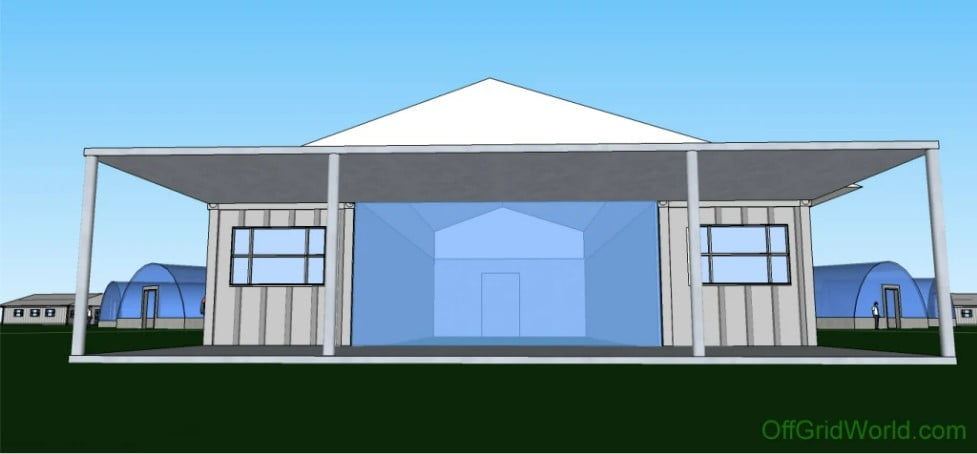
It’s not shown, but you could cut out half of the inside wall of one of the containers and form a very large kitchen, which opens into the dining room/living room common area, basically giving the whole place a very big “feel” inside. The addition of the large glass wall in the back is simply to give it a more open feel.
Ranch style shipping container home
Upgradable
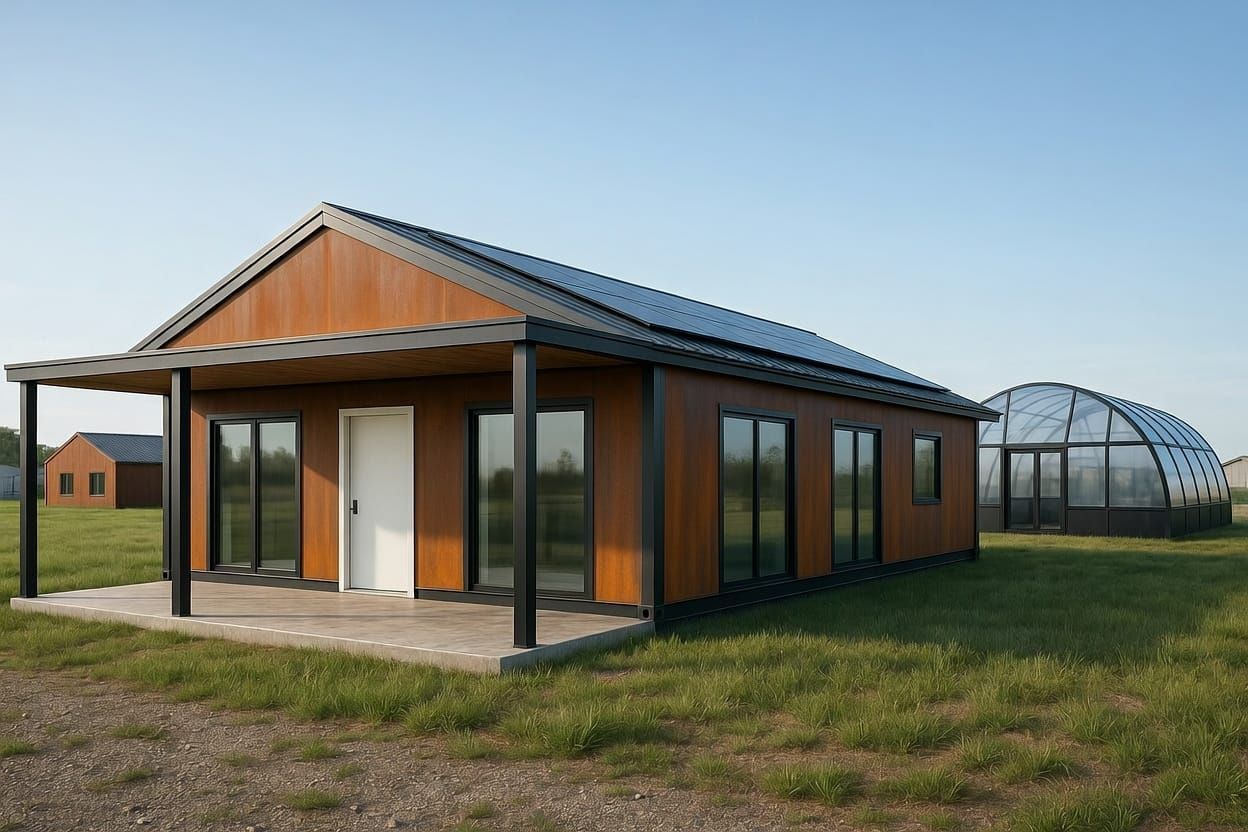
Notice how much more room there is inside. Really this is the whole idea. Technically, we could add another 8 feet to the width and increase the common area floor space by 33% to 960 square feet, and that would only increase costs by about $3000-$5000 in materials.
The rear of the house doesn’t have to be a glass wall, but it just looks nice and will give the interior space a large feel opening onto the back patio. I’m not sure you could get much more space for the money using only two 40’ shipping containers.
More for your money
1280 square feet is a good size to start out, even if you were to splurge a little with more expensive materials. You could add another $10k in amenities and still have one very affordable and very nice home. Spread the containers apart just 8 more feet and you increase the square footage to 1600 sqft. Not bad for the price, huh?
Ranch style shipping container home 3D model
Shipping container home floor plan
Ranch style container home floor plan
Shipping container home floor plan
Ranch style container home

***
This shipping container home design is an original design by Eric Wichman for OffGridWorld.com. It was originally published on OffGridWorld.com and is republished here with permission.
Disclaimer: These are 3D design concepts for shipping container homes. They’re only a design concepts, and they do not exist, and are not for sale. The pricing presented here (if any) are for BARE BONES materials, does not include freight, moving, crane rental, or any amenities. This design is licensed under an Open Source Creative Commons Share and Share AlikeNon-Commercial license, as long as proper credit and link is given to this website and the original OffGridWorld.com website article
Dear Reader,
I would greatly appreciate your support to help me create more content like this. My mission is to help folks on their journey to go off grid through educational and informative, and sometimes entertaining articles and essays about off grid living and survival.
I would be grateful for your support of this mission to help folks achieve their off grid dreams.
You can support the mission by subscribing to my off grid magazine here: Off Grid Living & Survival magazine Lifetime Membership Only $49 + ALL BACK ISSUES FREE
Thank you!
Sincerely,
Eric
